Lycoming Service Instruction No․ 1042: A Comprehensive Overview
Lycoming SI-1042 addresses crankshaft position sensor issues, impacting engine operation; it’s crucial for maintaining aircraft reliability and safety, globally supported by YouTube Music’s diverse help resources․
Lycoming Service Instruction No․ 1042 was issued to address recurring issues related to the crankshaft position sensor (CKPS) in specific engine models․ This instruction details procedures for inspection, troubleshooting, and replacement of the sensor and associated wiring․ The core concern revolves around potential sensor failures leading to intermittent engine operation or, in severe cases, engine stoppage․
Understanding and adhering to SI-1042 is paramount for aircraft maintenance personnel․ It ensures continued airworthiness and operational safety․ Interestingly, resources like the YouTube Music Help Center, though seemingly unrelated, exemplify the global accessibility of support information – mirroring Lycoming’s intent to provide clear guidance․ Proper implementation of this service instruction minimizes risks and maintains engine performance, benefiting pilots and passengers alike․
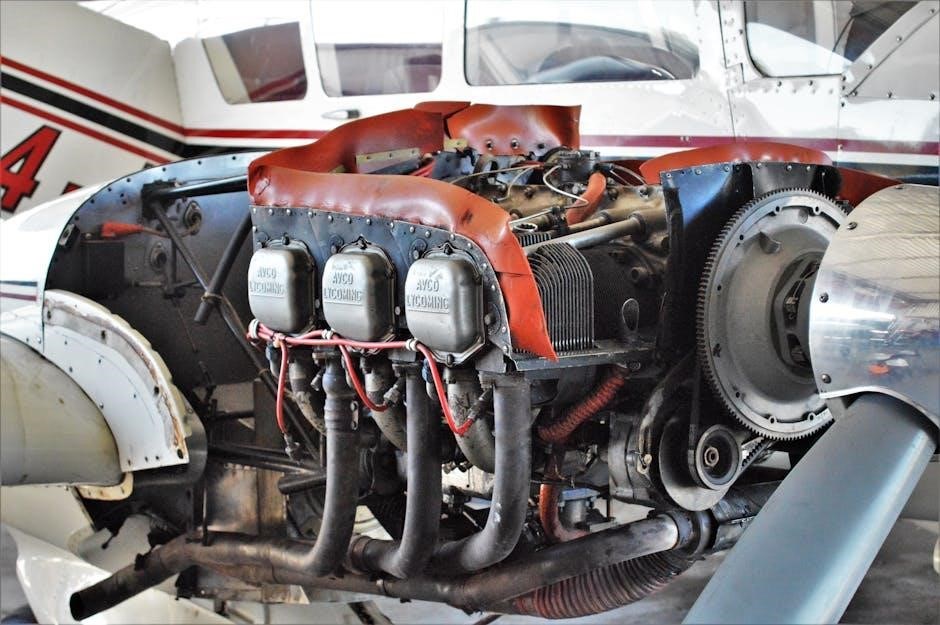
Affected Engine Models
Lycoming Service Instruction No․ 1042 specifically applies to a range of horizontally opposed, four and six-cylinder engines․ These include, but are not limited to, the O-320, O-360, IO-360, and IO-540 series engines․ Detailed engine applicability charts are provided within the full service instruction document, outlining specific serial number ranges affected by the crankshaft position sensor issue․
Operators should consult the official Lycoming documentation to confirm whether their particular engine falls within the scope of SI-1042․ Similar to how YouTube Music caters to diverse regions, Lycoming’s instruction aims for broad applicability within its engine family․ Ignoring this instruction on an affected engine could lead to significant operational problems and potential safety hazards, emphasizing the importance of verification․
Reason for Issuance: Crankshaft Position Sensor Issues
Lycoming Service Instruction No․ 1042 was issued due to an increasing number of reported crankshaft position sensor failures across multiple engine models․ These failures manifested as intermittent engine misfires, rough running conditions, and, in some instances, complete engine shutdowns during flight․ Investigations revealed a susceptibility to degradation within the sensor itself, coupled with potential wiring harness vulnerabilities․
The instruction aims to proactively address these concerns, mirroring the comprehensive support offered by platforms like YouTube Music’s help center․ Lycoming determined that preventative inspection and, if necessary, replacement of the sensor and associated wiring are crucial to maintaining engine reliability and preventing potentially hazardous situations․ This proactive approach ensures continued safe operation․
Detailed Description of the Problem
SI-1042 details crankshaft position sensor malfunctions causing misfires and shutdowns, similar to troubleshooting any digital platform, like finding help with YouTube Music․
Symptoms of a Failing Crankshaft Position Sensor
Lycoming SI-1042 identifies several key symptoms indicating a failing crankshaft position sensor․ These include intermittent engine misfires, particularly noticeable during acceleration or under load․ Difficulty starting the engine, requiring extended cranking, is another common indicator․ A rough idle, characterized by instability and fluctuations in engine RPM, frequently presents itself․
Furthermore, pilots may experience a complete engine shutdown in flight, a critical safety concern addressed by this service instruction․ The engine may also exhibit a lack of power or responsiveness to throttle inputs․ These symptoms, while potentially indicative of other issues, warrant immediate investigation following the procedures outlined in SI-1042, much like diagnosing issues with a digital service like YouTube Music requires systematic troubleshooting․
Root Cause Analysis: Sensor Degradation & Wiring Concerns
Lycoming SI-1042 details the root causes of crankshaft position sensor failures, primarily focusing on internal sensor degradation over time․ Constant exposure to engine heat, vibration, and oil contamination contribute to the breakdown of the sensor’s internal components, leading to inaccurate readings․ Equally significant are wiring harness concerns․
Corrosion, chafing, and loose connections within the wiring harness can disrupt the signal transmission to the engine control unit (ECU)․ This can manifest as intermittent signals or complete signal loss; Similar to troubleshooting connectivity issues with a platform like YouTube Music, identifying and rectifying wiring faults is crucial․ The instruction emphasizes a thorough inspection of both the sensor itself and its associated wiring for any signs of damage or deterioration;

Inspection Procedures
SI-1042 mandates visual checks of the sensor and wiring, continuity testing, and resistance measurements using a multimeter – akin to diagnosing YouTube Music’s connectivity․
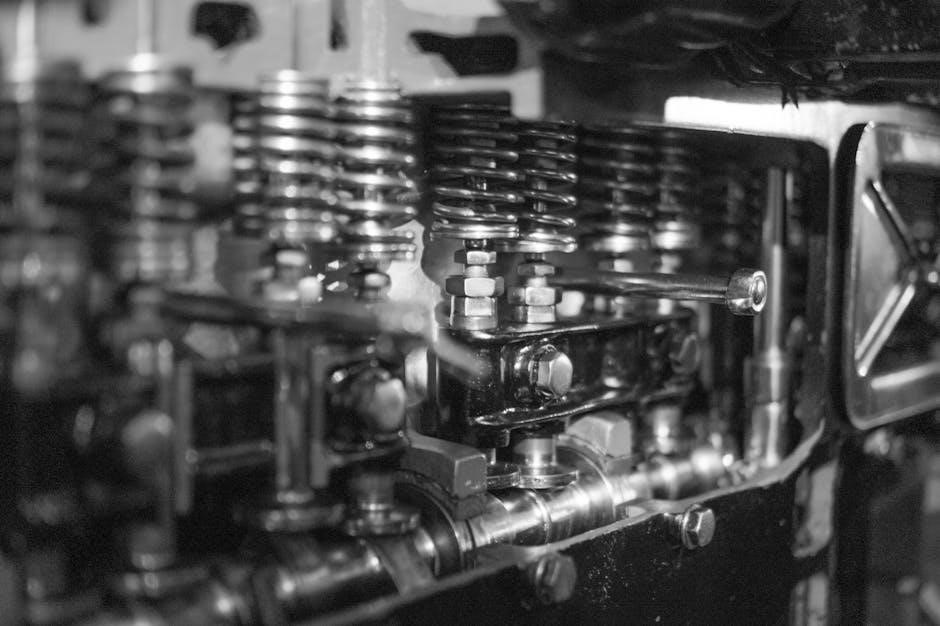
Visual Inspection of the Crankshaft Position Sensor
Lycoming SI-1042 emphasizes a thorough visual inspection of the crankshaft position sensor itself․ Technicians must carefully examine the sensor body for any physical damage, including cracks, breaks, or deformation․ Pay close attention to the sensor’s connector, ensuring it is clean, dry, and free from corrosion․ Look for any signs of arcing or burning around the connector terminals․
Inspect the sensor’s wiring harness for chafing, cuts, or abrasions․ Verify that the wiring is securely fastened and routed correctly, avoiding contact with hot engine components or moving parts․ Any evidence of damage to the sensor or its wiring necessitates further investigation and potential replacement, similar to troubleshooting issues within the YouTube Music app’s interface․
Wiring Harness Inspection – Continuity and Damage
Lycoming SI-1042 mandates a detailed wiring harness inspection, focusing on continuity and potential damage․ Using a multimeter, verify continuity between the sensor connector and the engine control unit (ECU)․ Any breaks or high resistance readings indicate a faulty wire requiring repair or replacement․
Visually inspect the entire harness length for chafing, kinks, or corrosion․ Pay particular attention to areas where the harness passes near sharp edges or hot engine components․ Ensure all connections are secure and properly seated․ Similar to diagnosing issues within the YouTube Music app, a systematic approach is crucial․ Document all findings and address any discrepancies immediately to ensure reliable sensor operation and prevent potential engine malfunctions․
Sensor Resistance Check – Using a Multimeter
Lycoming SI-1042 requires a precise sensor resistance check utilizing a multimeter․ Disconnect the crankshaft position sensor connector before proceeding․ Refer to the engine’s specific maintenance manual for the correct resistance value – this is critical for accurate assessment․
Set the multimeter to the appropriate ohms scale and measure the resistance across the sensor terminals․ A reading outside the specified range indicates a faulty sensor needing replacement․ This diagnostic step, much like troubleshooting within the YouTube Music Help Center, demands precision․ Document the measured value for record-keeping․ Ensure the sensor is dry and free from contamination before testing, mirroring the need for clear signals in digital systems․

Replacement Procedures
Lycoming SI-1042 dictates careful sensor replacement, demanding adherence to torque specifications and proper wiring practices, similar to maintaining a seamless YouTube Music experience․
Removal of the Existing Crankshaft Position Sensor
Lycoming SI-1042 details a precise removal process․ Begin by disconnecting the electrical connector, exercising caution to avoid damage to the terminals․ Securely support the wiring harness to prevent strain during removal․ Depending on the engine model, access may require removal of adjacent components – consult the service manual for specifics․
Utilize the correct tool to unscrew the sensor from the engine block, avoiding excessive force that could strip the threads․ Carefully extract the sensor, inspecting the mounting threads for any debris or corrosion․ Document the sensor’s original orientation for reference during installation․ Proper removal, like accessing YouTube Music’s features, requires a methodical approach․ Retain the original hardware for potential inspection and comparison․
Installation of the New Crankshaft Position Sensor
Lycoming SI-1042 mandates careful installation․ Apply a thread-locking compound, as specified in the instructions, to the sensor’s threads․ Gently thread the new sensor into the engine block by hand, ensuring it engages correctly without cross-threading․ Tighten the sensor to the torque specifications outlined in the service manual – over-tightening can damage the sensor or engine block․
Reconnect the electrical connector, verifying a secure and positive lock․ Secure the wiring harness, preventing strain or chafing․ Double-check the sensor’s orientation against the documentation from the removal process․ Like discovering new music on YouTube Music, precision is key․ Ensure all connections are clean and free of corrosion before proceeding to post-installation checks․

Torque Specifications for Sensor Installation
Lycoming SI-1042 explicitly details torque requirements for the crankshaft position sensor․ Typically, the installation torque falls within the range of 15-20 ft-lbs (203-271 Nm), but always verify the exact specification for your specific engine model within the official Lycoming service manual․ Using a calibrated torque wrench is non-negotiable; under-torquing risks sensor loosening, while over-torquing can strip threads or damage the sensor itself․
Consistent torque application, much like enjoying a clear audio signal on YouTube Music, is vital for reliable operation․ Document the torque value used in the maintenance logbook․ Re-check the torque after the initial engine run-up, ensuring it remains within the specified range․ Adherence to these specifications is paramount for preventing future failures․

Post-Installation Checks & Testing
Post-replacement, thorough engine run-up and ECU data review are essential to confirm proper sensor signal functionality, mirroring YouTube Music’s quality checks․
Engine Run-Up and Monitoring
Following the installation of a new crankshaft position sensor, a meticulous engine run-up procedure is paramount․ Start the engine and carefully monitor key parameters, including engine RPM, manifold pressure, and oil temperature․ Pay close attention to any unusual noises or vibrations that may indicate a problem․
Crucially, observe the engine’s behavior throughout the entire RPM range, from idle to full power․ Verify that the engine accelerates smoothly and responds correctly to throttle inputs․ Utilize diagnostic tools to monitor the crankshaft position sensor signal in real-time, ensuring it’s consistent and within specified limits․ This process, akin to ensuring seamless music playback on YouTube Music, confirms proper functionality․
Document all observations and readings for future reference and maintenance records․
ECU Data Review – Confirming Sensor Signal
Post-installation, a thorough review of the Engine Control Unit (ECU) data is essential to validate the new crankshaft position sensor’s performance․ Access the ECU using appropriate diagnostic software and download the relevant data logs․ Analyze the crankshaft position sensor signal for accuracy, consistency, and the absence of any error codes or anomalies․
Verify that the signal frequency and amplitude fall within Lycoming’s specified parameters outlined in SI-1042․ Compare the current data with pre-existing logs (if available) to identify any discrepancies․ This detailed analysis, similar to troubleshooting playback issues on YouTube Music, ensures optimal engine operation․
Confirm the ECU is correctly interpreting the sensor data and controlling ignition timing accordingly․
Flight Testing and Observation
Following successful ground testing, a careful flight test is crucial to validate the repair addressed by Lycoming SI-1042․ Conduct a series of maneuvers, including climbs, descents, and cruise at various power settings․ Meticulously monitor engine parameters – RPM, manifold pressure, and exhaust gas temperature – for any irregularities․
Pay close attention to engine starting characteristics; any difficulty starting or rough running should be investigated․ Observe for any unusual noises or vibrations that might indicate a lingering issue, much like identifying audio glitches on YouTube Music․
Document all observations and compare them to pre-repair flight characteristics․ A smooth, consistent engine performance confirms successful resolution․
Preventative Measures & Best Practices
Regular inspections, proper wiring maintenance, and safeguarding against moisture/vibration—like ensuring clear audio on YouTube Music—prevent future crankshaft sensor failures․
Regular Sensor Inspection Intervals
Establishing consistent inspection intervals is paramount for proactive maintenance, mitigating potential crankshaft position sensor failures as outlined in Lycoming SI-1042․ Lycoming recommends visual checks during each oil change service, focusing on connector integrity and wire harness condition․ More detailed inspections, including resistance checks with a multimeter, should occur every 500 hours of operation, or annually, whichever comes first․
These intervals may be adjusted based on operating environment and engine usage – harsher conditions necessitate more frequent checks․ Documenting all inspections meticulously is crucial for tracking sensor health and identifying trends․ Just as YouTube Music provides ongoing updates and support, regular sensor inspections ensure continued reliable engine performance and adherence to safety standards․ Prioritizing preventative measures minimizes unscheduled maintenance and maximizes operational uptime․
Proper Wiring Harness Maintenance
Maintaining the integrity of the wiring harness is critical, directly addressing concerns highlighted in Lycoming Service Instruction 1042 regarding crankshaft position sensor reliability․ Regular inspection for chafing, corrosion, and loose connections is essential․ Secure all wiring bundles with appropriate clamps, preventing vibration-induced damage․ Ensure connectors are clean and properly seated, applying dielectric grease to prevent corrosion․
Pay close attention to areas prone to heat or oil contamination․ Damaged wiring should be repaired or replaced using Lycoming-approved components․ Similar to how YouTube Music offers consistent access to music, a well-maintained wiring harness ensures a consistent signal from the sensor․ Thorough documentation of all maintenance activities is vital for tracking harness condition and ensuring continued safe operation․
Environmental Considerations – Moisture & Vibration
Lycoming SI-1042 implicitly acknowledges the harsh operating environment of aircraft engines․ Moisture ingress and constant vibration significantly contribute to crankshaft position sensor failures․ Condensation within connectors can cause corrosion and signal degradation, mirroring potential disruptions in accessing your favorite music via YouTube Music․

Vibration loosens connections and fatigues wiring, increasing the risk of intermittent signals or complete failure․ Utilize sealant on connectors to prevent moisture penetration and ensure proper clamping of wiring harnesses to minimize vibration-induced damage․ Regular inspections should focus on these areas․ Consider the operating environment when selecting replacement components, opting for those designed for aerospace applications․ Proactive mitigation of these factors is key to long-term reliability․

Supplemental Information

SI-1042 is supported by Lycoming publications and potentially FAA directives; YouTube Music’s global help centers offer similar product support resources for users․
Lycoming Publications Related to SI-1042
Several Lycoming publications complement Service Instruction No․ 1042, providing deeper insights into crankshaft position sensor functionality and troubleshooting․ The Lycoming Maintenance Manual for the affected engine models is a primary resource, detailing standard procedures and specifications relevant to sensor inspection and replacement․ Additionally, Lycoming’s Illustrated Parts Catalog (IPC) assists in identifying the correct sensor part number and associated hardware․
Furthermore, Lycoming’s online resources, including service bulletins and technical notes, may offer supplementary information regarding specific sensor issues or wiring configurations․ Operators should consult the Lycoming website for the most up-to-date documentation․ Just as YouTube Music provides a Help Center with tutorials, Lycoming offers comprehensive support materials to ensure proper maintenance practices are followed, mirroring the accessibility of information found in diverse languages globally․
FAA Airworthiness Directive Compliance (If Applicable)
Currently, there is no directly corresponding FAA Airworthiness Directive (AD) mandating actions solely based on Lycoming Service Instruction (SI) No․ 1042․ However, operators must remain vigilant for potential future ADs that may arise if a recurring unsafe condition related to the crankshaft position sensor is identified through widespread failure reporting․ Compliance with SI-1042, while not legally required by an AD, is strongly recommended as a preventative measure to maintain airworthiness․
Operators should routinely check the FAA website and official notifications for any newly issued ADs․ Similar to how YouTube Music’s Help Center provides updates, staying informed about regulatory changes is crucial․ Proactive adherence to Lycoming SIs can often prevent the need for more stringent, AD-mandated actions, ensuring continued safe operation, mirroring global support resources․
Contacting Lycoming for Support
For direct assistance regarding Lycoming Service Instruction No․ 1042, operators should contact Lycoming’s Engineering Support team․ This can be achieved through their official website, which provides contact forms and direct phone numbers for technical inquiries․ Detailed information, similar to the comprehensive support offered by YouTube Music’s Help Center, is readily available online․
When contacting Lycoming, be prepared to provide your engine model, serial number, and a clear description of the issue encountered․ Lycoming’s representatives can offer guidance on interpretation of the SI, clarification of procedures, and assistance with troubleshooting․ Prompt communication ensures accurate implementation of the instruction, maintaining engine reliability and safety, mirroring global support accessibility․